Explore this post with:

When Americans consider affordable home renovations, ceiling fans are not always on their minds. However, these humble units are perhaps one of the most efficient and dependable methods of increasing comfort without raising utility costs. In contrast to air conditioning units that dissipate kilowatts of electricity, a ceiling fan will generally use 15 to 90 watts, making it extremely energy-efficient. Combining a ceiling fan with your current HVAC can reduce cooling expenses by up to 30%, the U.S. Department of Energy states.
But aside from efficiency, ceiling fans serve another purpose: style. For many households throughout the U.S., a ceiling fan serves as a focal light source while also acting as a design accent. Modern designs include sleek blades, rustic farmhouse finishes, tropical palm-style models, and even smart-enabled versions compatible with voice assistants like Alexa. Whether you’re living in a compact apartment in New York City or a spacious suburban home in Texas, ceiling fans can be adapted to your needs.
Still, the benefits only reach their full potential if the fan is installed properly. A misaligned or poorly secured fan not only loses efficiency but also creates noise, vibrations, and even risks of electrical hazards. That’s why understanding the basics of Ceiling Fan installation is so important.
Why Proper Ceiling Fan Installation Matters
It is tempting to treat a ceiling fan as just another light fixture, but in practice, it demands a lot more accuracy. A fan can be as heavy as 15 to 50 pounds, and unlike a light fixture, it doesn’t merely hang inactive, it’s in motion, producing vibrations. Without sturdy support and proper wiring, issues appear in no time.
Here’s how careful installation is important for homeowners:
Safety Guarantee: An unsteady ceiling fan may develop loose over a period of time and come crashing down. Incorrect installation adds danger through vibration in seismically active states, such as California. Defective wiring may also lead to fires, particularly in older American houses constructed using outdated electrical systems.
Uniform Performance: An accurately installed fan provides the optimal airflow. A shaky fan or an unbalanced fan diminishes circulation, creating hot spots during summer or poor air recirculation during winter.
Noise Suppression: Sleepless nights due to a creaking fan are a typical issue faced by Americans who try hasty installations. Accurate balancing prevents whisper-quiet operation.
Longevity: A well-installed fan can live for 10–15 years with fewer problems. Faulty wiring or loose screws, on the other hand, will result in costly replacements every few years.
Energy Conservation: Even a slight wobble forces the motor to labor harder, meaning higher bills on your electric bill. Proper installation guarantees the energy savings promised by makers actually appear on your bill.
Types of Ceiling Fans
The market provides an amazing range of ceiling fans to complement home decor, room dimensions, and consumer choice. Knowing the categories enables you to select the correct one before considering installation.
Standard Ceiling Fans
The most popular style in US homes. They typically come with a downrod and function best in 8–9-foot ceiling rooms. Can be purchased in sizes ranging from 42 inches for bedrooms to over 60 inches for living rooms.
Low-Profile or Hugger Fans
Ideal for ceilings lower than 8 feet. They install flat against the ceiling for sufficient clearance. They are common in apartments, older ranch homes, and basements.
Dual-Motor Fans
Used in larger residences or theatrical commercial settings, these fans feature two tilt-adjustable heads with variable speed settings. They offer strong airflow and work well in great rooms with cathedral ceilings.
Outdoor Ceiling Fans
In hot U.S. climates such as Florida, Arizona, or the Carolinas, patio and porch fans are near necessities. Outdoor fans are constructed with weather-resistant coatings, moisture-proof motors, and blades resistant to warping due to humidity.
Smart Ceiling Fans
Popular in today’s American homes, these types provide app or voice control for speed adjustment, reversing blade direction, or dimming light. They usually connect to Amazon Alexa, Google Assistant, or Apple’s HomeKit
Selecting the appropriate fan style is not only about style, but also space, climate, and purpose. A kitchen requires a quiet, moisture-handling model, whereas a master suite does best with higher blade size and quiet operation.
Tools and Materials Needed

While the step-by-step process comes later, knowing what you’ll need upfront is critical. Fortunately, most of the tools required are either inexpensive or already found in a typical American household’s toolbox.
- Screwdrivers – Both flathead and Phillips head are needed since most ceiling fan kits come with varying screw designs.
- Drill and Drill Bits – For creating holes or tightening screws into tougher surfaces.
- Ladder or Step Stool – A sturdy ladder is necessary to comfortably reach the ceiling while keeping both hands free for work.
- Wire Cutters and Strippers – Electrical connections rely on cleanly stripped wires for proper conductivity.
- Voltage Tester – Essential for confirming there is no power running through the wires before you handle them.
- Fan-Rated Electrical Box – This is non-negotiable. Ceiling fans generate torque and vibrations, and a standard light fixture box won’t hold up over time.
- Mounting Bracket and Ceiling Fan Kit – Usually provided in the fan packaging, but it’s good to double-check compatibility with your ceiling type (angled or flat).
One important note for American readers: many fans sold at popular retailers like Home Depot or Lowe’s include most mounting hardware, but you’ll almost always need to supply your own fan-rated electrical box if you’re upgrading from a light fixture.
Safety Precautions
For DIY-loving People’s, ceiling fan installation might seem straightforward, but safety should never be underestimated. Working with electrical wiring and heavy fixtures overhead requires preparation.
1. Turn Off Power at the Breaker
Head to the breaker panel and switch off electricity to the room where you’re working. Don’t rely only on light switches.
2. Test Before You Touch
Use a voltage tester on exposed wires. Even retired electricians in the U.S. will tell you this is the one step you should never skip.
3. Ensure Adequate Support
Never trust drywall or plaster to hold the fan’s weight. A UL-listed fan-rated box attached to a ceiling joist or secured with an expandable brace is a must.
4. Check Ceiling Height and Clearance
U.S. building guidelines recommend at least 7 feet from the floor to the blades, and for higher ceilings, adding downrods to maintain proper airflow.
5. Personal Safety Gear
Work gloves improve grip and protect against sharp edges on mounting brackets. Safety glasses protect against sawdust, falling debris, or drops of insulation when drilling into overhead spaces.
Following these precautions doesn’t just save time, it ensures safety for everyone in the household for years to come.
Step-by-Step Process: How to Install a Ceiling Fan

Step 1: Preparation
Switch off the breaker to the room where you’re working, then confirm with a voltage tester that no wires are live. Remove any existing light fixture by unscrewing bulbs, fixture plates, and wire connections. At this stage, inspect the ceiling box carefully.
If it isn’t marked for fan support, replace it with a fan-rated one. This might mean installing a metal box attached directly to a ceiling joist or installing a retrofit brace specifically for supporting ceiling fans.
Step 2: Installing the Mounting Bracket
Secure the mounting bracket tightly into the recently installed fan-rated electric box. This is the anchor of the Ceiling Fan installation and keeps the fan sturdily in place. In vaulted ceiling homes, slope adapters will be necessary to keep the fan hanging straight rather than at an angle. Without correct bracket mounting, wobbling is practically certain.
Step 3: Assembling the Ceiling Fan
Mount your fan on the ground first before putting it on the ceiling. Connect the downrod to the motor housing and make sure to slide the canopy cover over the rod. In low ceilings, mount the motor directly with no downrod. More extensive rods are required in high ceilings to achieve the best airflow. Depending on the model fan and your ceiling height, you might be able to add blades at this point, but in many cases it’s advisable to mount them after the motor.
Step 4: Wiring the Fan
Wiring connections in U.S. houses usually stick to these color codes:
Black wire – feeds the fan motor
Blue wire – feeds the light kit
White wire – neutral
Green or bare copper wire – ground
Connect the fan’s wires with the respective ceiling wires, twist them together, and hold with wire nuts. Electrical tape wrap for added security before neatly stuffing them into the ceiling box. If the house features different wall switches for fan and light, the blue and black wires will connect to other hot wires. In case of uncertainty, refer to the manufacturer’s manual or seek the services of an electrician.
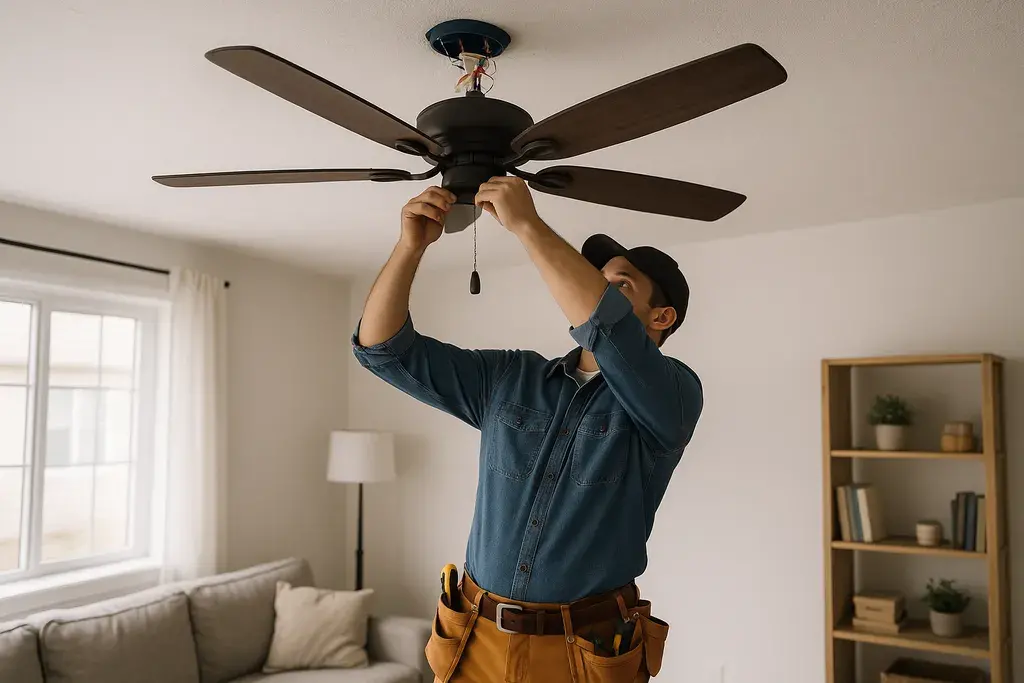
Step 5: Mounting the Fan
Hoist the motor unit into the bracket. Some fan kits come with a hook or notch on the bracket to support the motor temporarily while you make connections, preventing you from having to balance the fan on a ladder. After it’s placed in position and seated properly, fasten it with screws. Slide the canopy up over the bracket to conceal it and tighten it up, providing a clean and safe finish.
Step 6: Blade and Light Kit Attachment
Secure one fan blade to one bracket with a cross-patterned sequence, not in a circle one blade at a time. This avoids uneven stress on the motor and keeps the fan balanced. Secure all screws tightly to avoid rattling in the future. If adding a light kit, install it according to instructions, typically with quick-connect connectors or color-coded matching wires. Install bulbs and install light covers or shades.
Step 7: Testing the Installation
Restore power from the breaker and check the fan. Begin at low speed, working up through increasingly higher speeds. Check that the fan turns smoothly without wobbling or clicking if your fan has a reversible switch, and check the blade direction. Remember: counterclockwise is for summer cooling, and clockwise blows warm air downward in winter. Check the light kit also to ensure proper wiring and operation.
Cost of Ceiling Fan Installation and Maintenance Tips
Ceiling fans are one of the most practical home upgrades for improving comfort and reducing energy bills. They circulate air efficiently, making rooms feel cooler in summer and warmer in winter. But before installing one, homeowners often ask: What is the cost of ceiling fan installation, and how do I keep it running smoothly? Below, we’ll dive into installation costs, essential maintenance tips, and when you should call a professional.
Ceiling Fan Installation Cost
The average cost of ceiling fan installation ranges between $100 and $700 per fan, depending on several factors:
- Labor Charges: Hiring an electrician generally costs around $50–$200 per hour. Simple replacements may take one hour, while new installations requiring extra wiring could take 2–3 hours.
- Wiring Requirements: If you already have an existing fixture (like a light), installation is cheaper. Adding new wiring, outlets, or a fan-rated electrical box raises the cost significantly, often adding $350–$2000.
- Ceiling Height and Access: Fans installed on standard 8–9 ft ceilings are straightforward. Vaulted or cathedral ceilings may require scaffolding, extending labor time and cost.
- Fan Features: Remote control systems, integrated lights, or smart fan technology may require additional wiring or programming, costing $50–$1500 more.
Maintenance Tips for Ceiling Fans
Proper maintenance ensures smooth performance, quiet operation, and a longer lifespan. Here are three low-effort tasks every homeowner should know:
Clean Blades Regularly
Dust accumulation not only lowers efficiency but also spreads dirt into the air you breathe. Use a pillowcase trick (slip a pillowcase over the blade, pull away dust) or a microfiber cloth to clean monthly. For greasy buildup, mix mild dish soap with warm water.
Tighten Screws Occasionally
Screws on blade brackets, mounting plates, and downrods can loosen due to vibration. Twice a year, check all visible screws to prevent wobble and noise.
Use Balance Kits If Wobbling Persists
Fans often wobble because blades become misaligned. Balance kits, available at hardware stores for $5–$10, include weights and clips to help re-level blades. This extends motor life and improves comfort.
When to Call a Professional
Some ceiling fan projects are simply beyond DIY. Consider hiring a professional if you encounter:
Complex Wiring Situations
Installing a fan where none exists means running new wires or installing a fan-rated electrical box. Any electrical expansion beyond switching out an old fixture should be handled by a licensed electrician.
Low Ceiling or Angled Ceilings
Rooms with low ceilings need flush-mount fans, while angled ceilings may require special mounting kits. Incorrect installation here could be unsafe.
Uncertainty with Electrical Work
If you’re not confident matching wires, grounding connections, or securing mounting boxes, skip the risk. Incorrect wiring could lead to fire hazards.
Conclusion
In conclusion, ceiling fan installation is a practical and energy-efficient home improvement that enhances comfort and style while reducing cooling costs. Proper installation is essential to ensure safety, optimal performance, quiet operation, and long-lasting durability. With the right tools, materials, and careful attention to wiring and support, most homeowners can successfully install a ceiling fan.
However, for complex electrical work, unusual ceiling types, or safety concerns, consulting a professional electrician is advisable. Regular maintenance will keep fans running smoothly, making them a valuable and reliable addition to any American home.
In Case You Missed It!


